https://pagead2.googlesyndication.com/pagead/js/adsbygoogle.js
(adsbygoogle = window.adsbygoogle || []).push({});
A door is a focal point in an open concept home. I’ve been pondering about what to do with my steel door for a while. I saw a black door in a magazine several years ago (you can see the same images on this blog) and fell in love with it. Since we’ve been staying home, I’ve had more time to think and act on that decision.

Steel Door Transformation
The objective was to paint my interior steel double door black, and figure out a way to embellish the glass. Turns out it wasn’t as easy as I had expected it to be. I bought the all that I needed:
- black indoor paint
- white indoor paint
- painters tape
- sanding paper
- Paint rollers, brushes and tray
- Mitre saw
- Chair rails
There was my husband warning me that it won’t be as easy as it looks…but I’m like what the heck, how hard can this be! So I taped and sanded the door, then painted it black.
Chair Rails
You might be thinking what does chair rails have to do with paint?? For the glass portion of the steel door, I decided to apply a frame to it by using the chair rails sent to me by Ornamental Moulding & Millwork to create it. The plan was to leave the original black and natural wood combo of the rails. They have a wide variety of rustic mouldings, beams, shelves and mantels if you want to check them out. Originally I thought of adding them to the border of my newly revamped dining room table but that didn’t quite work out.
https://pagead2.googlesyndication.com/pagead/js/adsbygoogle.js
(adsbygoogle = window.adsbygoogle || []).push({});
Black Door
While the end result looked great, it simply didn’t suit my industrial rustic chic decor. However, if this is a style of door that suits your home, you can move on to the next step.

After all that work, I had to reverse it back to white. Sounds simple enough, right? Sure! So I went ahead and applied the white paint over the black…Only problem was that the paint started to peel! Now I had to remove all the black paint from both doors!!
I scraped off the black with a paint scraper. The panels remained black and I painted the frame of the door black while reversing the rest to white, including the frosted glass.

White Door
Before applying the white, I taped the black panels, painted the glass, then taped the glass to paint its border black.
The paint would easily peel off the border due to its material, so it was extremely fragile. This meant that I had to touch up several times over and constantly re-tape to avoid staining the white areas with black.

This is a second option you can opt for should you feel it suits your home.
Glass
By the end, the door looked great but the glass looked awful and blocked all sunlight. Sure I should have thought about it but I figured white will deflect light into the house…not really…and it looked ugly…Yet again I found myself scraping off paint and with it, the frosting came off. By the end, I had found a way to easily remove the paint from the glass but at that point I was nearly done…

Once I removed the paint off the window, I had to retouch the border AGAIN! I tried to adjust the remaining black panels but the edges were getting messy. Scraping it off was the optimal solution.


Frame
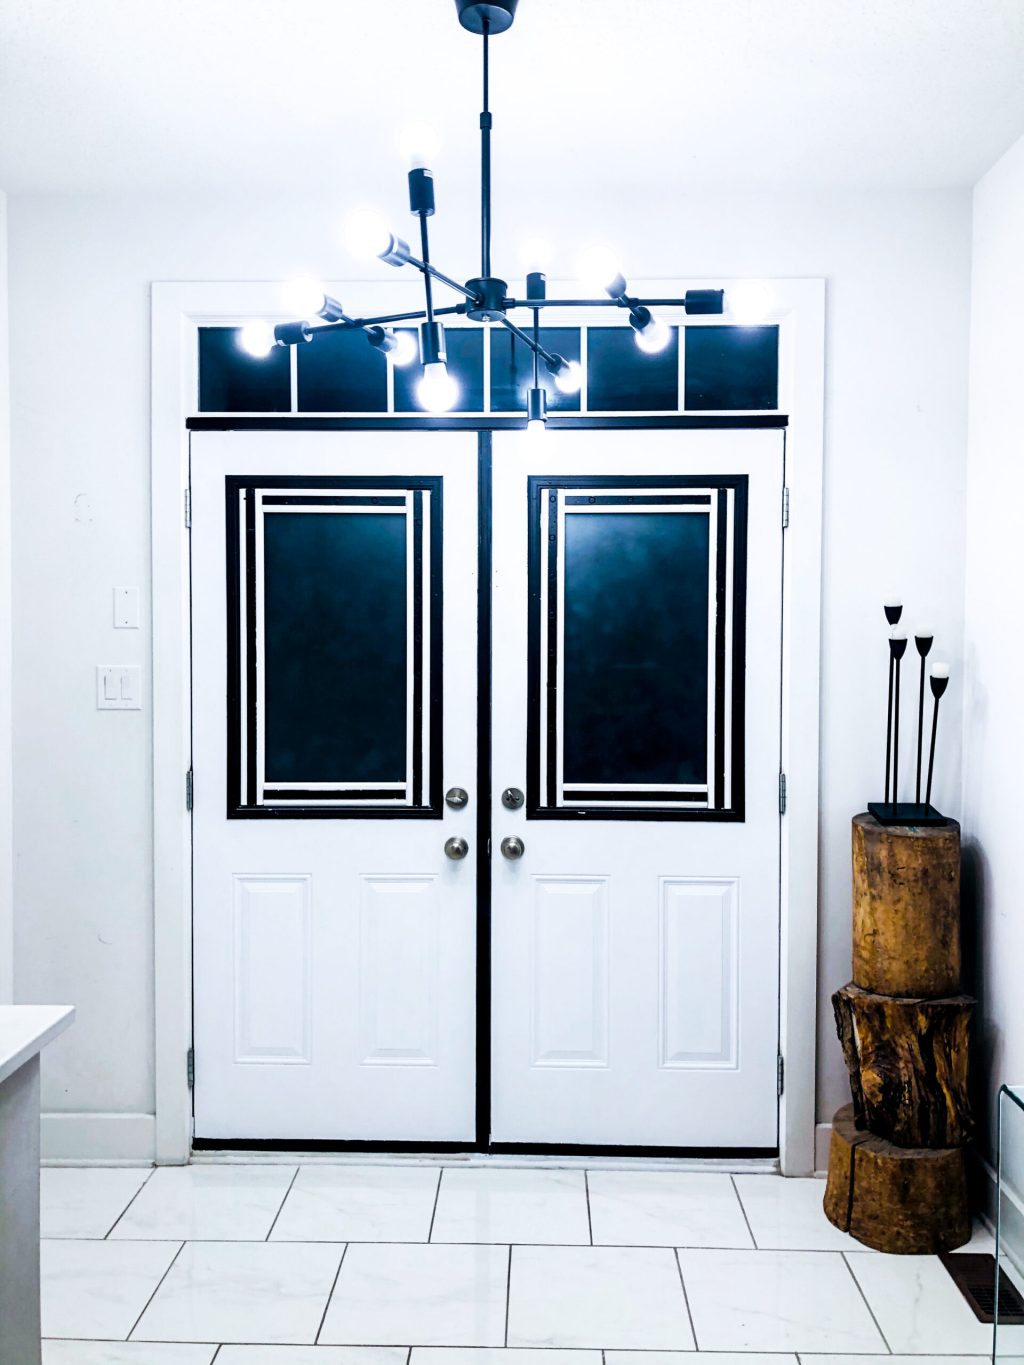
My final decision was to make the entire door white except for the frame, and add the chair rails to the window but paint the natural wood parts in white.
We measured the dimensions and cut all wooden pieces to size.

I taped the middle part and painted the rest white.

As for the door, I taped the door and painted the rims black as well as the newly scraped panels. I fixed unevenness with the scraper and reapplied paint.

After completing the door, it was time to redo the frosting. It should have been done prior to painting the border black but let’s just say this was a huge learning experience. The frosting, while clear, left particles on the black as it was emitted from the can. Given that I was adding the rails on top, no need to retouch since it’ll be masked.

Once I removed the tape off of the rails, the white had stained some of the black and in other parts, the tape covered off some of the natural wood so it needed touch-ups.
We used a glue gun with heavy duty glue sticks to stick the frame to the glass. Once added to the window, it did scrape some of the fragile black on the border which meant another round of touch ups…

Exterior
In this project, I didn’t yet account for the outdoor painting because it has been quite humid. In addition, I thought it may be wiser to wait until I redesign my front porch and yard to avoid going over the same dilemma I went through with the inside.
However, I may have to act sooner on covering the boards from the outside with another boarder I can paint over or find a more temporary solution.
Lessons Learned
Needless to say, while the end result is worth it, this project took over an entire week’s full time work to perform. Aside from the taping, painting, scraping, and touching up, my floor was suffering despite me adding a sheet to cover. The paint scrapes were sticking to the ceramic, hardwood, our feet and flip flops. Towards the end, I ended up taping a plastic sheet over the ceramic floor and adding a tray to collect scrapes, then quickly passing the broom.
Another lesson is while initially I was planning on painting the glass white so the rails don’t show from the outside, leaving it frosted meant that the boards are visible from the outside. If you’re looking for ready made doors, check out Home Depot replacement doors.

The Gist of it
It may have sounded awfully difficult to transform your steel door but it really wasn’t. Trial an error is great but some cost more time than others. The key is to properly study your home style and if possible, opt for material that is easily removable or even photoshop to imagine your space prior to changing it. In addition, line up every activity so you know which one should come before which and avoid spending additional time on needless tasks.
P.S. If you enjoyed this post, sign up to my newsletter to get the latest advice, tips, and giveaways right into your inbox!
(function(d, s, id) {
window.Wishpond = window.Wishpond || {};
Wishpond.merchantId = ‘867182’;
Wishpond.writeKey = ’59f0e9b51410′;
var js, wpjs = d.getElementsByTagName(s)[0];
if (d.getElementById(id)) return;
js = d.createElement(s); js.id = id;
js.src = “//cdn.wishpond.net/connect.js”;
wpjs.parentNode.insertBefore(js, wpjs);
}(document, ‘script’, ‘wishpond-connect’));

Leave a comment