Yey! Are you as excited as I am about another round of Friday fashion fun linkup with my lovely co-host Grace? Cool!
This week I’m re-showing an outfit that I posted not too long ago where I promised I would show you how you can actually MAKE a DIY fur vest! Don’t worry, it classifies under easy DIY projects will little amount of tools and materials. At the end you can even download the FREE step-by-step tutorial to follow along.
Also, Grace also has another fab giveaway for you this week so be sure to cast your ballot for it.
Linkup Outfit
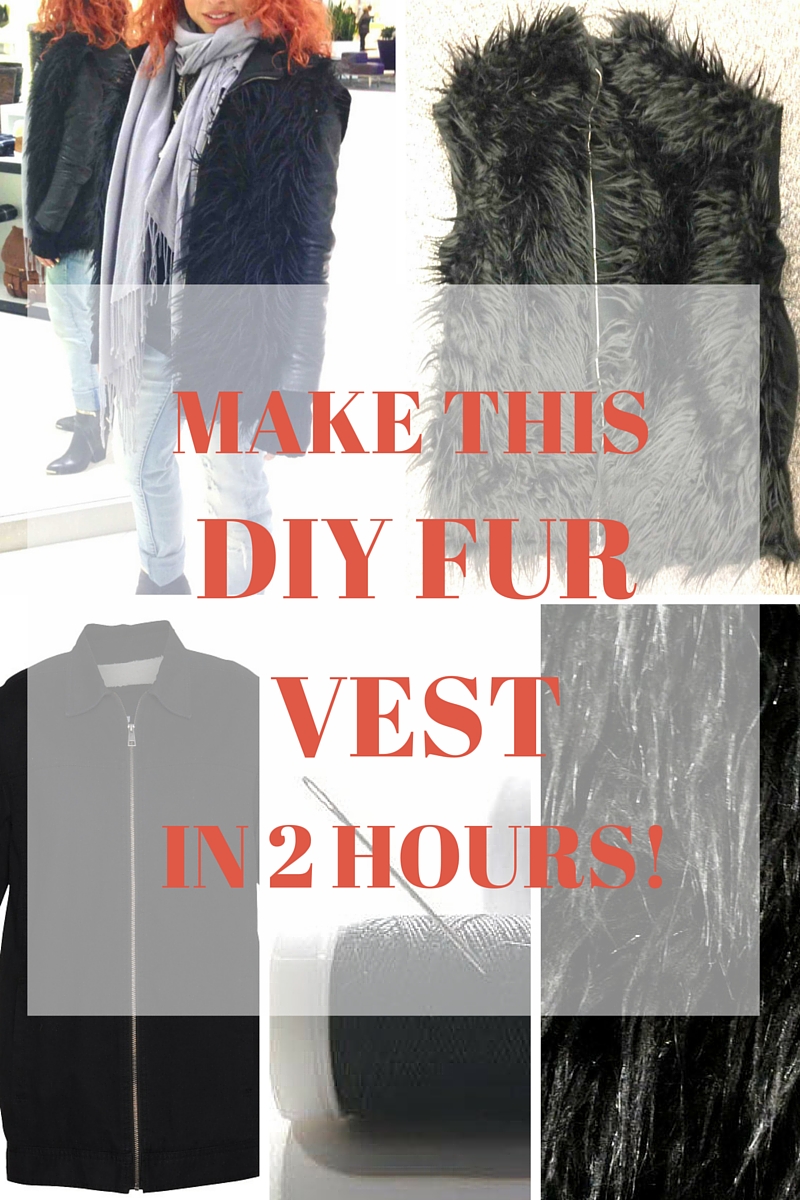
For this weeks linkup, I’m dipping into my recent archives and bringing back the DIY fur vest I promised I’d show you how to make a couple of months ago. So here is the finished product.

Paired my Joe Fresh Boyfriend jeans in light distressed wash and my super awesome cowboy snake booties with gold accents from Aldo, my DIY fur vest was combined with my absolute fave leather jacket from Rome under it. I put on a heavy sweater under to keep me warm at the arms since it was the beginning of winter.
Make your Very Own DIY Fur Vest in 2 Hours!
You literally do not need than a couple of hours to get this DIY fur vest project done. Best part is, that old husband/boyfriend zip-up you were almost going to throw out just became very handy. You’ll use it as your base for your DIY fur vest. Remember you can download this to follow along.

Ok let’s get cracking.
Here is What you Need
- Scissors
- Thread
- Large needle
- Seamstress pins
- Furry Fabric panels
- Preferably something that’s already in a rectangular shape.
- Old hoody or zip-up sweater
- It can be one with a hoody or not.
- An oversized one such as your man’s is ideal.
Easy Steps to Your DIY Furry Vest

Start by measuring your zip-up’s front bodice length to determine how much of the furry fabric you need.
Measure the furry fabric length and cut 2 pieces 2 cm below the required length.
Cut the sleeves off leaving about 1.5cm before the armhole seam.

Now lay your hoody flat on the table or floor if you’re a gypsy like me.
Take one of the panels you just cut and place it at the front bodice. Lay it neatly to iron out any folds or pleats.
Pin it with seamstress pins so you can secure it to the hoody. Place the pins from the inside of the zip-up because it’s hard to get in through the hairs.
If you have a collar, place some of the furry fabric on it to cover it up as well.
Make sure that you do not place the furry fabric over the zipper and as you are pinning it, push the hairs away from the zipper.

You can do this next step by machine if you’re an excellent seamstress. If not, do it by hand. Sew along the edges to secure the furry fabric to your zip-up.
Turn it around and you’re DONE!


You can download these instructions HERE so you can have a copy to follow along to make your DIY fur vest.
Share your experience with me as I’d love to see your version :).
$50 Gift Card Giveaway Time
Now Grace is teaming up with Shabby Apple to run a one week giveaway. They are very generous and are giving out a $50 gift card to use on their website. Good luck and don’t forget to join us for the linkup party!
a Rafflecopter giveaway
https://widget-prime.rafflecopter.com/launch.js
About Grace

Grace from Colour & Grace. Based in Troy, Michigan, Grace is a 41 year-old petite woman who loves colours. Born and raised in China, she moved to America for love in 2007. Her day job – teacher. Her dream job – fashion blogger.
It’s Time for You to Link up
- Bloglovin: Grace & The WardrobeStylist
- Google +: Grace & The Wardrobe Stylist
- Instagram: Grace & The Wardrobe Stylist

Leave a comment