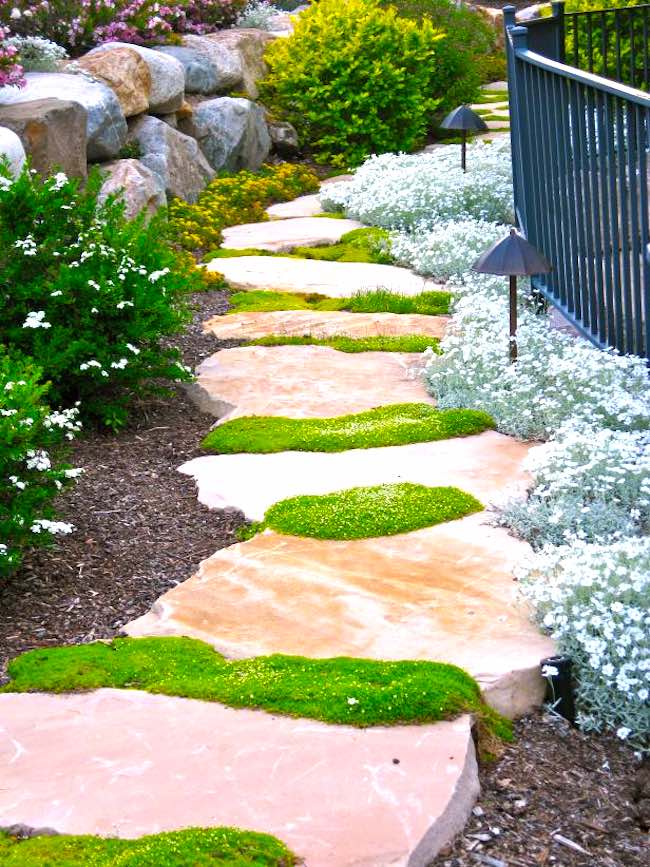
An attractive and useful design feature to consider when you’re re-doing your landscaping equates to some sort of stepping stone path. Whether it goes from the patio to a storage shed or from the deck to your vegetable garden, it’s definitely preferable to walking on dirt or mud.
A friend recently changed her old deck for a new flagstone patio, so it only made sense for her to go with a flagstone walkway as well.
Luckily, learning how to put down a flagstone path wasn’t too complicated, and she was able to lay the stepping stones in a weekend.

Flagstone Walkway Project
This weekend project will change the whole face of your yard. Let these 7 tips light the path for your flagstone walkway.
If you are also considering a lovely natural stone pathway and are looking for how to lay flagstones, this guide has you covered. Read on for everything you need to know about a DIY flagstone walkway installation.

Project Needs
Here’s what you’ll need to successfully complete your flagstone waklway.
Tools
- metal rake
- broom
- shovel
- garden hose
- gloves
Materials
- landscape fabric
- plastic edging
- gravel
- water
- sand
- flagstones
- garden nozzle
https://www.googletagservices.com/tag/js/gpt.js
var googletag = googletag || {};
googletag.cmd = googletag.cmd || [];
googletag.cmd.push(function() {
googletag.defineSlot(‘/360613911/GenericDFP2017’, [728, 90], ‘div-gpt-ad-1506002846364-0’).addService(googletag.pubads());
googletag.pubads().enableSingleRequest();
googletag.enableServices();
});
Flagstone Benefits
A flagstone (which is any sedimentary stone known for its layers, such as quartzite, sandstone, and bluestone) for a patio gives an organic look. There are many benefits to installing a flagstone walkway. Generally speaking, flagstone is:
- Durable
- Resists heat, moisture, and wear-and-tear
- Naturally slip-resistant
- Acid-resistant, so it can be laid directly over soil
- Easy to install
- Low maintenance
Preparing The Ground For Flagstone
One of the benefits of flagstone is that it can be put down directly on dirt, perhaps with the help of sand for stability. If you’re laying a flagstone path in dirt, you’ll want to clear the area of any weeds or debris, smoothing it out with a shovel or rake.

You may want to consider digging down 3-4 inches deep where you want the path to go because it’ll end up raised by the time you’re done.
Keep things level by giving yourself room for the added height of the stone.
Lay Out Edging
You don’t need to get decorative with your edging just yet. You may want to line your pathway so you know the direction you want it to take.
For instance, my friend’s stone path runs along the edge of her grass. To help her with the lines of the pathway, she first put in bender board edging for the grass. If you don’t have (or need) that clear of a delineation for your path, feel free to skip this step.
Prepare The Base
While you can put flagstone on dirt, it’s recommended that you still prep the area to help with weed control and pathway stability. To help prevent weeds, put down landscape fabric that you can find at your local nursery or home improvement store.
To keep your stones in place, laying stepping stones on sand is a good idea. Put down a 2-inch layer of sand, which you rake smooth, then press down with a hand tamper.

My friend just put sand under the stones themselves because she don’t have any issues with drainage, but spreading sand over the entire area can be helpful for areas with drainage problems. In especially rainy areas, you may want to consider putting down a 1- or 2-inch layer of gravel first.
Plan Out the Flagstone
Figuring out the exact shape of the path and what pieces you want where can be a little tricky. Think of it like a jigsaw puzzle. Lay out the pieces so that they fit the lines of your path and are easy to walk on.
Keep in mind that natural stone (especially flagstone with its layers) isn’t smooth, so look out for pieces that have the potential to be a tripping hazards. If a given piece of stone is especially rough or has a large lip right in the middle, perhaps use the other side.

It took my friend several iterations of layouts before she was happy with the spacing and the combination of stone shapes and sizes. Don’t be afraid to play around with your design.
Lay The Flagstone
When your flagstone walkway looks like what you want, work each stone carefully down into the sand until it’s firmly in place. Make sure each piece is level. If your ground is sloped or the stone piece is especially uneven, you may need to level things out by adding or removing some of the sand.

Finish the Walkway
Once all of your pieces are firmly laid, it’s time to finish your stepping stone walkway installation by filling in the gaps. Whether you decide on pebbles, gravel, or low-riding plants, you’ve got plenty of ground cover options depending on the look you’re going for.

My friend finished hers with a wood bark mulch that blends nicely into the rest of our garden.
The Gist of it
You see, laying out a flagstone walkway can be a breeze. One you’ve gotten your material, set out a chunk of time on a sunny weekend to get it all done so you can enjoy it for the hot months to come. Then you can consider other ways from housetipster.com to update your backyard.
Will you be trying some fun backyard projects this spring and summer?
P.S. If you enjoyed this post, sign up to my newsletter to get the latest advice, tips, and giveaways right into your inbox!
(function(d, s, id) {
window.Wishpond = window.Wishpond || {};
Wishpond.merchantId = ‘867182’;
Wishpond.writeKey = ’59f0e9b51410′;
var js, wpjs = d.getElementsByTagName(s)[0];
if (d.getElementById(id)) return;
js = d.createElement(s); js.id = id;
js.src = “//cdn.wishpond.net/connect.js”;
wpjs.parentNode.insertBefore(js, wpjs);
}(document, ‘script’, ‘wishpond-connect’));

Leave a comment